Saturday, July 28, 2018

A Time Capsule


Hey guys its Taylor, I’m back. I wrote the blog about our first real day of field school working on our and your beloved Fort St. Joseph Archaeological Project. Since that exciting first day we have all made lots of progress excavating our units in a slow but sure process. Like I mentioned in my first blog the unit coordinates for the unit that me and my partner Sami are working on are North 9 East 2. We are currently digging down to thirty five centimeters below our datum point. After we worked our way down layer by layer we slowly have amassed many awesome artifacts. There is already a full blog written by my pit partner about the amazing lead seal we found in our unit on the first week, but that was just the beginning.

 After we found the seal and continued to dig we found multiple artifacts that are just as if not even more awesome than the lead seal. The first cool artifact we found after the lead seal was small in size but not in meaning, which was a tinkling cone we found while wet screening. Our tinkling cone has a conical shape although not all tinkling cones are conical they will occasionally be asymmetrical having a small point on the bottom. Tinkling cones are made of copper or a copper alloy and were used by Native Americans as a decorative accessory on their clothes and jewelry. The second artifact we found right after the tinkling cone was a catlinite pipe bowl fragment that was found while trowel skimming. Catlinite was named for George Catlin who was a famous painter and author that specialized in painting Native Americans in the “old west”. Catlinite is a fine grained sedimentary rock that is often brownish-red in hue.

 
Copper ring found at N9 E2. 
The second week of field school we found a copper ring while trowel skimming. Copper rings have been found at Fort St. Joseph before and were previously believed to be French Jesuit rings. The story being that Jesuit priests would give them out to award people who converted like some Natives did. The fact of the matter is that we are trying to move away from associating these copper rings exclusively to Jesuits because it was not only Jesuits who brought these rings from France. Other French non Jesuit people also brought them to trade with Natives. Our ring was generally small in diameter and did not have any obvious iconography on it, just a band. In the same week we found another amazing copper artifact. The artifact was a triangular shape made up off three copper circles with what looks like stones but is actually cut glass in each copper circle. The cut glass, like the oxidized copper, is green and we think it may have been a part of a cross off a rosary or some type of jewelry.

Copper alloy and cut green glass artifact.

This week we have found two more amazing artifacts. The first artifact we found was an awesome type of bead called a raspberry bead. The bead is blue and translucent and relatively large compared to the other types of beads we have been finding like seed beads which are appropriately named for their extremely small size. The specific reason for calling the bead a raspberry bead is because since they are made from blown glass the maker will use a technique resulting in a bumpy pattern on the outside of the bead much like a raspberry. 

Right after we found the raspberry bead in the wet screen, and I mean right after, we found another lead seal! I could not believe It but there it was. Just like the first one it was a lead disk with non-uniform edges. One side had a protrusion indicating it was most likely the back while the other side had some inscription that I could not make out but nonetheless it was another seal.
Blue "raspberry" bead.
Although we can learn a lot about what the artifacts are made of and there size and what level of the unit they came from that is not the most important thing we can learn. The most important thing we can try and take away from our artifacts is what they indicate was going on in the past. We can take the raw data from the artifacts and with quality deep thinking we can recreate a picture of the past. For example, the tinkling cone, we can learn its size and what it is made of but, we can also try and learn how they were being used in day to day life during Native and French occupation. We can ask questions like who was making the tinkling cones, how were they making them, how were they were being used, and who was using them? These types of thoughtful questions about the past paired with raw information learned from the uncovered artifacts is how we can successfully create an accurate depiction of day to day life in the past.


Lead seal reverse
Lead seal obverse.


I am very fortunate to be excavating the area that I am and I am also very fortunate to be excavating at Fort St. Joseph. Not one day has gone by that we have not found something from the time of French occupation and I know this is not the case with every unit and certainly not the case with all archaeological field work. As much credit as we can take for finding these awesome artifacts it is really all the previous work others have done from the Niles and field school communities that allows me and my pit partner to be so fortunate. All the information gathered over the years has put us in the position to be told where to dig and be successful no questions asked and that is no small task. Because of this I must thank all the students, staff, and community members that have made this success possible. You have made our field school interesting and fun and worth it, thank you.


Friday, July 27, 2018

A Day in the Life of a WMU Field School Student


Prepared for the field with trowel
 and fanny-pack.
Good evening,
My name is Andrea and I am participating in 2018 WMU field school. I am not a full-time student; I have been in the military for last nine years and just taking time off to complete this course. I have been out of the academic world for a bit and I decided it's high time I finished my degree. The archaeological field school goes towards my anthropology major, however, I'd like to think of it as living out a childhood dream. My dream was a bit more action packed; I was definitely a lot cooler than I currently am (I'm single handedly bringing back the fanny-pack) and I always envisioned being in some far away land, but this is a satisfying compromise. I am the oldest field school student at the grandiose age of 30 while my classmates are about 10 yrs younger (These little youths have endless supplies of energy and can stay up until 1:00am no problem. I'm out by 9:00pm). I'm pretty sure they are referring to me as the "old lady".


If you want to become an archaeologist, you'll need a field school. The Fort St. Joseph site is a great place to learn the Art of Le Archaeology. You don't have to be in some far away land to study archaeology, it's here in our own backyard, Michiganders. In this blog I will give you the inside scoop on a day in the life of a field school student/old lady.

Monday through Friday we live in Niles at a lovely farm house that the University rents for us (definitely not a bed and breakfast). The home was once a stable on the Morris estate but has since been converted and suits the field school needs perfectly. My day begins at 5:00am when I get up and make the coffee. I've been getting up at 5:00am for so long I just can't seem to break the habit. My classmates are up around 7:00am. We eat breakfast then usually have a meeting at 7:50am. After the meeting we head out to the field. 

At the site we unload our supplies and untarp our excavation units. At the beginning of the season everyone was assigned a pit-partner and a 1x2 meter unit to excavate. We split our units in half and go down 5cm at a time on one side then the other. As we collect soil we begin to wet screen. We place the soil on a screen and spray it down with a hose. The water washes away the dirt while screen catches our tiny artifacts. Once we have reached the bottom of our level we will map it and annotate any artifacts, structural stones and the soil composition and the zone. Currently at the FSJ site we have three soil zones; alluvium, plow, and occupation. As of right now none of our units are down to the occupation zone but in the next day or so we should hit it. When we collect artifacts from our units we put them in bags or viles and tag them with the level, zone, accession number, depth, site, provenience, and date. The artifacts found in the wet screen will be placed on a dry screen first. 

A collage of N11 W4. Top images: interesting finds (animal remains
and seed beads); middle left: N11 W4 before clearing;
 bottom left: sawing out root; bottom right: my unit. 
  
After we leave the field each day we head straight to the local YMCA. The Y has graciously allowed us to use their showers! Which is amazing because instead of waiting in a 19 person long line at our residence we are in and out in 15mins. Thank you YMCA! 

Every night an assigned set of pit- partners prepares dinner for our group. Tonight we had curry; I have never tried curry before but it was great and I'm glad we have an opportunity to try new things. Some nights we are lucky enough to be hosted by community members. It's always a treat when the community hosts us because you really get to see first-hand how much this project means to them.


Every Wednesday we attend lectures at the Niles District Library. This year’s lecture series theme is Technology. So far, we have heard lectures on "Cross Cultural Technologies of the Great Lakes Region during the Fur Trade Era" (18th century reenactment) and "Explaining the 'Boom' in Copper in Copper Studies: How New Technologies Help us to Understand Old Ones" and this past Wednesday the topic was "Crafting Culture at Fort St. Joseph: The Technology of Tinkling Cone Production". The lectures are always interesting and give us new insights on understanding the artifacts we find.

Brush'em, brush'em, brush'em!

In the evenings we have 2 hours of lab where we wash and sort the artifacts that we collected from the field. The artifacts are then placed on a drying rack. Once the artifacts have dried, we sort them and catalog them.

And that's all I got to say about that.

Wednesday, July 25, 2018

Blast from the Past: a Visit to The History Museum


Imagine: You're a voyageur, canoeing through the wilderness of Michigan, carrying your trade goods and maybe a few passengers. It's beautiful, challenging, possibly deadly, and doesn't have the best pay, but there's nothing else you'd rather be doing. 
Our very own voyageurs.
This is the story for most voyageurs in the American fur trade, and the Fort St. Joseph Archaeological Project students know this because we were fortunate enough to get a special “behind the scenes” tour of the Fur Trade exhibit at the History Museum in South Bend, Indiana. My name is Miro, and I’m a student in the FSJAP from Albion College. In our tour of the museum, we got to see the Fort St Joseph exhibit, an exhibit about the history of the Fort St Joseph river valley, and we got to see a large amount of artifacts from the museum’s Fort St Joseph archives that are not currently being shown in the museum (not due to the artifact’s importance, simply due to lack of space or context). We first explored the artifacts that were in the archives, and discussed them at great length. All of these artifacts were found right where we are excavating now: What does that mean for our excavations?


Examining artifacts previously found at the Fort St. Joseph site.
  Hopefully, something awesome. We got to examine artifacts like scissors, knives, cutlery, beads made of glass and bone, kettle pieces and accessories, gun parts, and much more. It was truly fascinating to see such a large array of amazing artifacts in one place all from where we were digging, and it made the idea of our excavations even more exciting, because there is the chance that we will also find really amazing stuff! It was also amazing from the sheer quantity of technology and creativity that went into making all of the objects we were observing. Our theme this year for the field school is technology, and we all were asked questions about our observations, like what different artifacts were made out of, or what they were used for, and how that usage may have evolved. For a lot of the artifacts, the usage was so ingenious that the only thing that really changed in their creation was the materials they were made of. For other artifacts, like the gun parts, the overall concept was kept, in example, the lighting of the gunpowder, but the means by which this was completed changed, from gunflints being used to spark gunpowder to a hammer being used to propel and shoot a bullet.

 After we were done marveling at the sheer number and quality of the artifacts we had just seen, it was on to the Fort St Joseph exhibit. The Fort St Joseph exhibit is a collection of hallways with bright informational posters lining the walls, and one large display case with everything from historically accurate clothing to taxidermied animals to examples of letters from the site. The posters on the walls were easily the most interesting part, and the most prevalent part. Although they didn’t have any examples of artifacts, they had lots of pictures, quotes, and maps, which were really helpful in understanding the context and feeling of the period.  I personally learned a lot of details of events that I have only studied to some extent but never had a lot of context to accompany it. There was information about both the history of the Fort, but also information about the Project and the things we are doing in order to discover more about the Fort.

The exhibit about the history of the St Joseph River valley was much more in depth and all-encompassing than just the Fort exhibit alone. It had history from mastodons to modern technology there, and it was all extremely fascinating. I never realized how influential the St. Joseph river valley was to the history of Michigan and the Midwest. Many different treaties and important laws were signed in the area, and the museum had a vast collection of artifacts from many different eras that was truly astounding. I would definitely like to go back to the museum and explore around more! To check out the museum’s website, go to https://historymuseumsb.org/.
           

Tuesday, July 24, 2018

Basic Excavation Techniques


Hey, everyone! I’m Gary, and this is my fourth year with the Fort St. Joseph Archaeological Project. I live in Three Rivers (a few pipes up the river from Niles) with my chocolate labrador Jack. I recently graduated from WMU with a degree in Anthropology. 

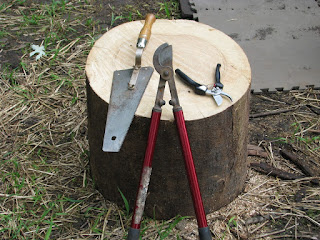
As a member of the staff, I spend most of my time in the field assisting students with basic excavation techniques, including methods for working around and removing roots from their units. Accordingly, if you’ve ever tried to dig in an area near trees, you know how frustrating roots can be. Here at the field school, we teach three basic methods for removing roots. If the roots are pinky size or smaller, we use pruning shears, and for larger roots, we use loppers (see photo). However, if the roots are too large for the loppers or protruding through the sidewall of a unit, we use a modified handsaw, which we put together a few years back. Meaning that, we installed an offset handle on a semi-aggressive handsaw blade.  We like this method because it’s simplistic, versatile, and enables us to maintain clean, flat profile walls (see video).